
SCAD X HARBOR PICTURES
Final Week:
After a very long quarter, with many sleepless weekends, this project has been complete. There are some aspects which I look at as CBB (Could be better), but for 10 weeks, I am very proud of where it is.
Here is the final cut :)
Week 9:
This week was a long one as we need 99% of our project by the end of it. Since it is the last week, I am going to outline this weeks post with going shot by shot and talk about the difficulties and triumphs while doing lighting and look development.
Shot 01 - The main feedback from last week on shot 01 was mainly things done in compositing, including mudding up the image, DOF, and some color changes. Lighting wise, they wanted much more lighting from the flame on not just the tongs and pot, but also the forge. For this I worked with Mojie and Bomin to use emission from the actual flame. Bomin and Mojie turned the flame into geometry which would then be used as a light source in Solaris. I also set and animated a spot light within the actual flame pipe. This worked a treat and added a lot more light to our scene which has come a very long way. Here is the Solaris setup that I setup for all of our layers as well as the viewport scene.


Shot 01 has come the farthest out of all of our shots, from color to a complete change in the forge. I am very happy with where it has come and I think sending it to Sydney will be good to get the strong DOF. This is my slap comp with my own color correction and DOF, not the final pixels from our compositor!


Shot 02and03:
This shot hasn’t changed much compared to previous versions in term of layout or lighting, but the environment has grown in time. This was, by far, one of the easier of the few shots we have. I really like how it has come. Here is a final slap comp and the layers involved.


Shot0 04:
This shot gave us a lot of issues in terms of artifacts and render issues, but once those were sorted, it became much smoother when delivering. Here is my final slap comp with the layers I gave to our compositor.


Shot 05:
This shot is by far my favorite one. Though it is not our hero shot, it was the shot I spent the 2nd most amount of time on. The Bubble shader has changed drastically and grown far past it’s first pass. The lighting has changed to become more dynamic and integrated overall.


Shot 06:
This shot was out hero shot which I spent the most amount of time developing. There was many render issues and render time issues, but with brute force and a load of optimizing, we got a beautiful result. I am very happy with not just the shaders on the watch, but the overall composition of the scene. Here is that final frame.


Week by week, I have been the singular person on my team who has been rendering. For all the shots, there are a total of 20 layers that needed to be rendered at 1920x1080. To get the best picture, with the least amount of noise, it was a challenge with sampling our files. On top of this, we also rendered DeepEXR render passes for Sydney so that she could get a stronger control of the DOF. The issues with this is that DeepEXRs can’t be rendered on the SCAD Render Farm just yet. So these had to be rendered locally. The Render Farm 2 hour kill also made it difficult for some shots to be pushed through. There was a lot of re-rendering with higher Ram to get the frames through. Some frames were capped at a minimum of 2+ hours so those ones had to be rendered locally. On top of that, we were having some issues with our water pouring shot and missing textures when rendered on the farm. To combat this, about 20 of those frames had to be rendered locally at about 1.5 hrs/frame. To make this long and arduous process work, I was working on about 7-8 computers and sliding between them setting up and wrangling my frames for my render. Here was a Google Doc I used to help keep me organized during this process. Since SCAD only allows you to log into 2 computers at a time, I was using my teammate’s logins and accounts to push these renders through.

Week 8:
This week was a lot more work than it maybe should have been. My main focus for this week was lighting and shaders, as always. I had a lot of fun working on the bubble shader this week, with the help of professor Gaynor, I think we have them looking more like air bubbles in a thing of water rather than small rocks. The main thing to fix was the small watch refraction result we were getting in our bubble render. This was due to having an IOR of 1.3 which was refracting the watch into the bubble, giving an appearance of high refraction. This would be perfect if these were water droplets, but they are not, it is air bubbles. Air has a refraction of 1, however since it is still in water, there is a slight refraction. To get our refraction and still get the light we need - we added a coat to our bubbles. With a spec IOR of 1.033 and a coat IOR of 3, we were able to have refraction through the transmission with the spec and still getting a high catch of light with the coat. Here is a snapshot from last week's bubbles vs this week's bubbles.


I used a handful of reference to get our bubbles looking right as well as going back through some physics behind Snells Law. Here is few of the references for my bubbles and the shader we want to build up for them.


In Snells law, the light passing through the bubbles will take the path that takes the least amount of time. This of course depends on the material which is measured with the respect to the Normals. This means if the light is going direction perpendicular to the objects face, it will pass directly through and not refract. However, this is only the case for a few rays and most rays will refract in a different direction. The IOR of Water is 1.33. but since these are air bubbles in water, the IOR is virtually inverted. To achieve this refraction we are using a relatively lower IOR for Transmission refraction but a high Coat IOR for the extra specularity. I think the result we got was what we were looking to achieve and I’m happy with how it is coming along.
On top of the bubbles, we have a new simulation for our water pouring shot. Since this pass we also have another simulation of the water that we are planning on going with. Molly suggested that we could dip the camera into the water, but with the new simulation it feels as though we are getting filled with the water with the same camera so we didn’t change it to much other than a slight downward angle. We want to see what the mentors think about it before we move on. Here is that new water shot - keep in mind there is a lot of artifacting in the clip that we want to address before next week.
We have a new simulation that Mojie, FX artist on team, has been working on. For his Cache file, to help with render time and how heavy it is, I decided to cull the geometry to the camera. I did this two ways to see which one would have the path of least resistance. For both, I am creative a volume based on the camera frustum and controlling the density for quality of the cull. For one way, I am creative a group based on the volume frustum, inverting the group and then blasting the inverse. For the other I am using a wrangle node with the following line of code. This takes the amount of volume samples, and using the point of the volume, it deletes the points in the connected geometry.
Here is the node graph for my two ways to cull the geometry and the result in the viewport.


For the last big change this week, we have done a number on the lighting for shot01 and shot06. The lighting brings more light to the cup and tongs as well as the environment in shot 01. Similarly, we made the lighting more dynamic/dramatic in shot06 to make our gears pop more in our shot. We still have a lot of work to get done for our project, which I am excited to address. I think we are getting real close to getting our final renders done!

Week 7:
This week was a good week of progress where a lot of big strides were taken. For shots 04/05/06, the cameras and lighting were the big focus of the week. We spent some time as a team changing and adjusting out cameras. Molly, from Harbor Pictures, said to connect shots 04-06, we should push our camera in instead of pull it out, as to push in to the fine details of the gears, before pulling out for the final reveal. Vi (https://www.linkedin.com/in/vi-nguyen-85713833/) had a lot of comments about the various lighting throughout are scene. She gave the push to go too far then pull back from there. Her main comments were about shot 04, the pouring one, where the lighting made everything look flat and not very interesting. So that was the first thing I attacked this week for our list of shots. Here is shot 04 with the full comp and new lighting.
Another thing I approached this week was the bubbles for shot 05. They had a dark rim around them that made them look super CG. This was due our HDR being predominately dark toned all around with only spot lights scattered. To fix this issue, we found a new HDR and for our Bubble pass, we are using the reflections for the bubbles, but the lighting from the same HDR as the watch. Here is that current render pass for this week as well as all the layers. The watch, bubbles, and glass were all done on separate layers from one another and comped together by Sydney. This helped my control samples for noise, so I could increase refraction noise on the glass, but not on the watch body, saving me render time and giving Sydney more control of the layers.
For shot 06, a lot has changed from last week to this week, chief among them, changes in the voxel count, changed by Bomin, one of the FX members on my team. This made for better render times and got rid of crashing when exporting a USD to send to the farm. For the 9 layers of smoke, I sent them to the farm in layers of 3, to help with better render time, and less strain on the USD export. I worked a bit on the shader for our watch box, aiming for a leather/fabric based one. It still needs some work, as well as the overall lighting, but I think it is definitely coming along. Here is that final comp pass for shot 06.
Shot 01 was the last one I attended to this weekend. Shot 02/3 wasn’t worked on much as I like it’s current state and not much priority was needed this week. However, for shot 01, a lot of work and head scratching was put into how I could optimize the scene better. The fire was super heavy, and it seemed the light emitting from it was creating 2-3 hour renders. But when I turned down the density on the GEO render pass/layer, and turned some intensity on the shaders down, it worked well enough that I could send a pass to the farm no trouble. I also put some work into relighting/texturing the background, but had some issues when it came to the color output that I need to figure out for the next pass. Here is shot 01 with full comp and the layers for it as well.
Overall, a lot of work was done this week, and a lot more to come. Here is the continuity quilt for this weeks pass.
Week 6:
This week was an absolutely huge week of learning and troubleshooting for our project. The mentors from Harbor Pictures gave us a great bit of advice for where our project is headed. The main thing they mentioned was getting our shot composition in order. The main thing they seemed to agree on was the need for deep compositing defocus and depth of field. We have environments that extend very far in our composition, so having a deep level of compositing with controlled DOF is something we definitely needed. Sydney, my teammate, tackled doing this in Nuke, while my job consisted of rendering the DeepEXRs from Karma. It is super rough to do one the farm, so these had to be rendered locally, which wasn’t too difficult as the render was pretty quick. I also set up some render passes for our shots, in this way we could render out the FX separate from the GEO but still get light and shadow interaction. Here was the node setup for the passes and deep Karma settings as well as an example of the passes for the Bubbles shot.


For rendering this week, the main thing I focused on was the FX shaders, the shaders/textures for the bubbles, water, and the molten platinum. I also did a little bit of work on some Hero elements, but those will definitely be changed and researched more into. Not a lot of work went into the background machines. I had a simple shader on them for the render of shot01, but something went wrong in my USD Rop to the Renderfarm and messed with the texture. I am very happy with how the bubble and water shaders are coming along, and think we have made good progress in building it up. Here is our current continuity quit which shows a current still frame from our current renders this week.
For this week, rendering and optimizing are definitely something we want to focus on. Like I said previously, rendering on the farm was very difficult as the USDs have been a major problem for us. For shots 01, 02, and 06, rendering out a USD from the Rop has crashed the computer when doing more than 15 frames or so. What we believe it might be is the size of our files, they might be too heavy for the USD Rop to cache out, which is why we want to focus on separating out elements to save on the force needed to render the USD. If we can crack this, sending our files to the farm will drastically help render time and make our lives, especially mine, much easier. Rendering locally took up much of our time this weekend and made us behind for the deep DOF comps. We also will give our compositor, Sydney, more time with the renders to do some deeper compositing. Despite this, we were able to get some renders out and get some composting going. Here is the current rough cut with our current renders this week.
We also are working with a sound designer, named Braden Little, a sound designer at SCAD, who is helping us build our music and sound effects for our shots. Here is the work he has gotten to us with the little time he’s had for the project. This is last weeks pre-vis, but the shots are the same.
Week 5:
As we approach the start of week 5, I am happy to say that me and my team have been super busy at work on our project trying to catch up from the snowstorm that really put a damper on our progress. We received a lot of feedback from the mentors about our project from Tuesday and have been hard at work. The first thing that contributed to all of us was the decision to go fully CG for our project. The mentors mentioned how awkward the first two shots were with how big it was composition wise. They suggested cropping them in to have more focus on the actual process of the watch making and not the person making it. They also mentioned that the shot with the man placing the gears seemed out of place and didn’t really add much to the story except slow it down. So as a group we decided to axe the man in the scene and rid the comp since, as the mentors also mentioned, object tracking would be more work than it was worth. We still have 6 shots, but here is an updated continuity quilt with some stills of our current renders.
From last week, we got a lot of pointers and advice about our shaders for our watch. My turntable was very overexposed and bright in the hot spots, which made it hard to tell what exactly was the problem. Furthermore, Billy (https://www.linkedin.com/in/dongyoonjang/) pointed out that my macbeth chart wasn’t working properly which makes it hard to tell what the actual problem is with the lighting or shaders. This was super helpful and helped me develop a better turntable for our watch. He also gave some good advice on where to find reference for furthering our metals. On top of what Billy said, Vi (https://www.linkedin.com/in/vi-nguyen-85713833/) gave a good idea in adding a third color/metal to our watch since the blue and platinum was too basic and didn’t add much depth. From this, I have been developing a gold/brushed gold shader that we plan on using for our gears, similar to the way the reference has it. After I furthered the shaders and rendered a new turntable, I added some animation to our gears using expressions in Maya. I then exported them as an FBX, separate to the shaders, so that it was easy to adjust in Houdini. Here is that animation as well as the gear reference
For my turntable, Professor Gaynor gave the thought that it was likely the high levels we have in our HDR. So she assisted me in redoing our HDR in Photoshop, this time using 32bits and the raw photos from the set, which allowed for this HDR to be made and used properly.
And here is the newly made turntable and adjusted HDR/lighting/shaders.
After I got the shaders looking decent, we wanted to do a test render/preliminary lighting for our shots. Since I am the 3D guy for our group. I spent my entire weekend, adjusting lighting and some initial shaders. I feel I got the best results on the water shots and final shot as I haven’t had the time to add texture to our environment or do much work on the pots/tongs as they aren’t the product of our project. But over the time I spent this weekend, I got some basic lights set up as well as our cameras that we plan on locking. For the renders I haven’t had much time to work on, I did little lighting and focus on the background. I also wasn’t able to render Shot01, my teammate Bomin Kim handled that one for this week, but here are shots 2-3. Ones I wish to keep developing as these are pretty rough at the moment.
Though I didn’t spend much time on those shots, I did get shots 4-6 looks somewhat decent. One thing I know off the bat from these renders is that the FX need more development and the water shader is one that will take a minute to get looking right. I like these shots as I think our watch shaders are getting very close to where we will have them for the remainder of our project. Here are shots 4-6.
There is still MUCH work to be done overall, but as for how far we are, I feel we are making great progress and strides, and I am excited to hear more from the mentors and develop our project further.
Week 4:
Over the past week my team and I have been busy at work getting progress on our shots and have made quite a bit of progress. A lot of what the mentors, from Harbor Pictures, said about our project had to do with our shot composition and framing. They mentioned they liked our color and mood board we landed on, with more blue and dark tone with bright highlights. Here is the mood board we shared with them.
Vi, a lead compositor at Harbor (https://www.linkedin.com/in/vi-nguyen-85713833/), had a few things, specifically about our last shot and how we plan on framing it. We initially planned on our actor placing a CG glass case on our watch stand and doing a CG combination with the Live Action plate. However after filming, we figured getting the proper information into Maya/Houdini for proper reflections and mesh sizing would be more work than it was worth. She also mentioned how the transition we initially had for our product wasn’t smooth and not very clear. Here is the updated last shot previs showing our final product placement and size. I really like the motion and think when we get lighting, hints of lasers and smoke, then it will look amazing!
Kyle, creative director at Harbor (https://www.linkedin.com/in/kylecody/), mainly talked about our actor placement and consistent composition. One thing he mentioned that we are definitely applying is not showing our actor. We want to obviously show that a human with hands is working on our product, but not creating a relationship or life into the character. More of focusing on the art and not the artist. Here is a representation of our updated composition and shot layout for our RoughCut.
Billy Jang, also a creative director at Harbor (https://www.linkedin.com/in/dongyoonjang/), had a few ideas and references for us to use for our shaders and textures for our watch. He emphasized the idea that many watch companies have specific designs and intricate details to separate each watch from one another. We applied some of the ideas he had on changing our design of our shaders making our watch have some more depth instead of being basic. Here is the most recent turntable as well as some stills I have done for our watch design. There is also a turntable for the current concrete texture which is going on our cup for pouring.


The mentors had a lot of good things to say and plenty of good improvements and work for us to get to. They are very good at articulating what they expect or want to see more of, which is always nice when working on a project like ours.
Other than what the mentors had to say and making those changes, there was a lot of work to be done for continuing our project. As far as look dev and lighting goes, beyond what we did with Billy’s advice, I worked a lot on refining the shaders, finding more and more references for what we want. I also got to work on the procedural animation for our final shot, as the gears will be turning as the camera zooms out, and found that the model we are currently using is not only difficult to work with, but not very detailed. With the help of my teammate Mojie Tang, we found a new model that has much more detail and better topology that we plan on using. That is the same model shown in the turntable above as well as below.

Beyond just the shaders and model, I have matched a CG RenderCam to our live action plates, shots 1-3. I did this using a cube to find the perspective as well as camera data that we gathered from our shoot on the GS stage. I sent these cameras to my teammates Bomin Kim and Yiqi Zheng, so they can match their shots with the live action plates. Here is one of the shot (shot 02) that shows not only the framing, but the perspective camera. Also attached in a quick slap comp that my team members, Sydney and Yiqi, did with it in Houdini.


There wasn’t much time to get work done this week, as the snow storm really hindered my ability to work, but we have made a lot of progress in a short amount of time for this week!
Week 3:
This week started with us pitching tot he mentors our plan of attack for our project. All in all, they seemed to like our idea of making it a mysterious/puzzling vibe for out scene. Their main concern seemed to be on the color and how we will use it in our video to enhance our scene. This was the vibe that Kyle sent us, using this color for the overall tone of our images. This is the mood board if you will of our current project.
The second thing they mentioned was getting a better vibe for our last shot of the beauty reveal in the vault. They felt that the lasers and secrecy of the shot made it make the watch “unattainable” which isn’t what we are going for. I think that is a perfect way to describe it in total. So we have decided for our group we will make the shot a push in of the watch, with a subtle hint of lasers/some sort of protection guarding this valuable item. We also want to make sure that the watch case that it is in is fancy to compliment the design/aesthetic we are trying to achieve. Here’s a collage of reference for what that shot might feel like.
We also talked through our opening FX shots and wanted to shift from the primitive way of melting our platinum/metallic objects and wanted to achieve a more sophisticated way of melting them. We landed on these references and think this is how we will proceed with the shots, abandoning yellow, hot versions we had prior.
After we got all of this settled we can now start our Look Dev Rig and Lighting our metallic properties. This is the current Work In Progress for the Lighting Reference. I am creating a quilt of Shaders, using simplistic shaders, and a more neutral lighting HDR.
Towards the end of week 2, me and the rest of my team had some new ideas for attacking our shot composition based on the mentors feedback. We took our refined ideas back to our Storyboard artist, Kailey Gorsuch (https://www.kaileygorsuch.com), who gave us this new storyboard which we then used for shooting.
On the saturday of week 2, me and the rest of team Conos had our first shoot set and ready to go. We had a stand-in actor, Tyler Gula (https://www.instagram.com/tylergulaa/), be our actor/hand model for our project. He really helped bring our character to life using his skills as a performing arts major. We shot on the GS stage as well as the dark room next to it. Since our project has quite a bit of background replacement/set extensions as well as close up hand shots, we didn’t need a specific set nor all shots on the GS stage. Here are a few pictures from the set as well as stills from current shots. Our opening shot of showing the fire is to be determined if it were to get approved by the mentors for our story.


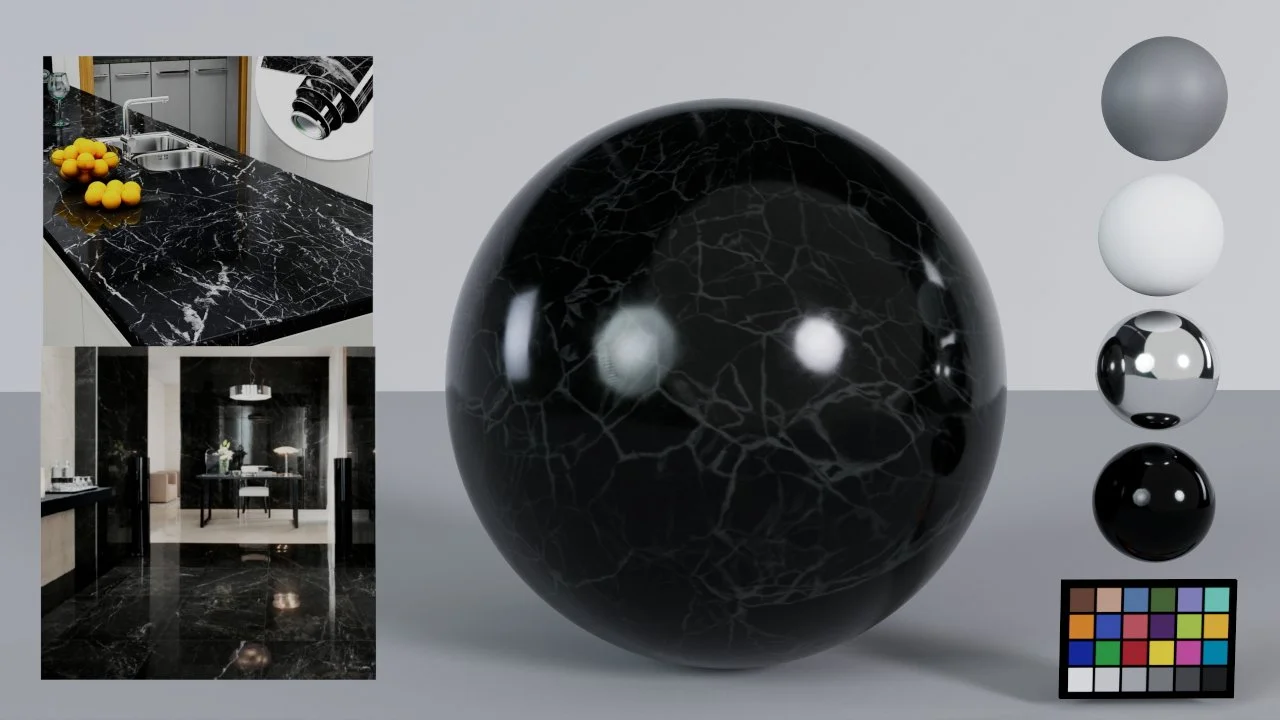
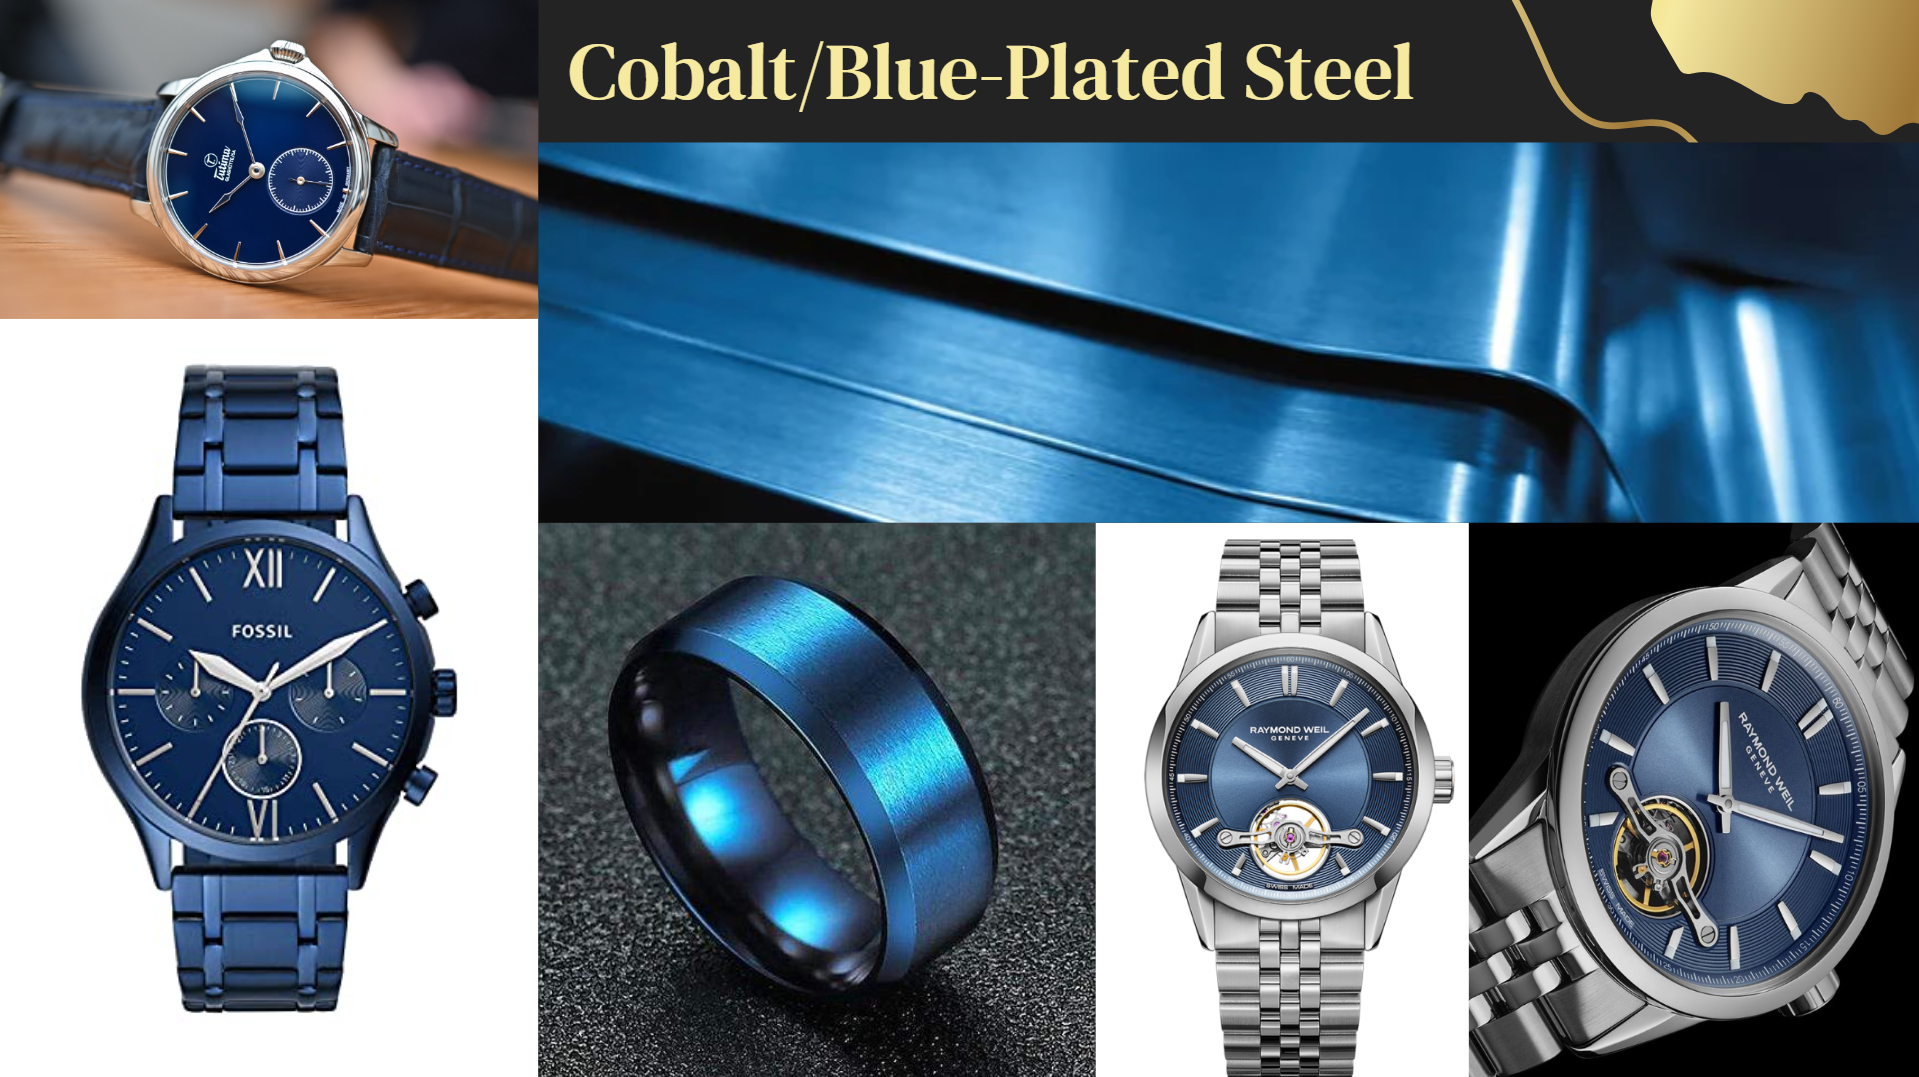
As well as shooting our first plates, I spent the weekend refining our textures for our project. Here is a gallery of all the textures we plan on using. Including Platinum, Brushed Steel, and Blue-Plated Steel for our watch, as well as Marble, Concrete, Iron, Glass, Water, and Bubbles. We plan on using Maya with Arnold and Houdini with Karma for our rendering, so I did two passes of the textures in both Maya and Houdini. The lighting is simple as we shot in a studio, so a simple neutral HDR is beneficial for showing our textures in the right light.
Maya - Rendered in Arnold


Houdini - Rendered in Karma


As well as making the textures, I also rendered a turntable of our watch with the Platinum, Brushed Steel, and Blue-Plated Steel applied for a first pass look. Here is that Turntable
For the big three, Platinum, Brushed Steel, and Blue-Plated Steel, we really wanted to nail them, so we used a ton of reference for making our textures.


While I was working on the textures this weekend, my team was busy at work gathering more references and working on previs for the FX shots we plan on doing. Mojie Tang rendered a first pass of the bubble FX he is working on for one shot, Yiqi Zheng showed some previs of the molten metal shot, working on the viscosity of the sim. Bomin Kim is working on both the opening fire shot, should it get approved, as well as the laser previs for our final shot.


Week 1-2:

For the 2025 Winter Quarter at SCAD. The Animation/VFX Department is colaborating with Harbor Pictures. I had the great opportunity to join a team of my fellow students and embark on a journey of creative growth.
For this project, I was designated as the 3D/2D lead. I was joined by 3 FX artists, Bomin Kim, Mojie Tang, and Yiqi Zheng. We also were joined by Sydney Relkin, who was our designated compositor.

This first week, we met our groups and jumped into our project ideation. We were given the prompt of some sort of LUXE Item. We brainstormed between Designer Brands, Bags/Purses, and Jewelry. We ended up landing on Jewelry, with a heavy interest in luxury watches.
We started our ideation project through zoom calls and a shared document. The vibe we wanted to go for was Squid Game, mysterious, robbery, etc. The logline we came up with was as follows:
Created from primitive materials to the esteemed staple seen today, this watch is kept hidden for only the finest
We initially had the idea of doing a full scene with a story arc attached. Robber breaking into a high class jewelry manufacturer, turning off/dodging lasers to reach the LUXE watch encased in a secure glass case. However, we pivoted our idea to a combination, of the high class LUXE vault with an assortment of CG advertisement shots. This was the Storyboard we cam up with more or less for what we are picturing. I drew the initial ideas, but Kailey Gorsuch (https://www.kaileygorsuch.com) did the actual drawings.

These storyboards helped us level out our design and overall tone we wanted to establish. From this we created this Mood Board as well as Technical Plan. We know we will need Houdini for this project, but a combination of Maya lighting and Nuke relighting was something we wanted to explore.


For this project we have gathered a plethora of reference that we plan on using. The amount of research and development we did will really help us in the long run for this project. Here’s a collage of some of our best we have gathered for an idea of where we are taking this project.


Overall I am really excited for this project and can’t wait to get started :)