TECHNICAL COMPOSITING - SCAD W25
Week 9:
Class 18:
I haven’t made great strides in my project, but strides nonetheless have been made. I have started doing some cleanup on my plate, fixing up the BG where my case reveals the plate after being opened. I have also done some more work on my shaders for my geometry with the drums, saxophone, piano and case interior. I also moved my lights around to match the direction of plate, specifically on the right and left sides of the case. I definitely want to move them further and change some parameters, but I haven’t had much time to sit and really work on this project. My render passes are the same, with one new one being an alpha pass for adjusting the defocus of my rendered shaders. Finally, I have changed my animation of my stage, it spins slower and in the other direction. Here is the alpha pass for the defocus. It isn’t perfect, but as time became an issue, I haven’t gotten to fix it yet.

Here is my clean plate I have been working on, specifically with the right side of the box, I am doing it in segments as with the track and paralax, the fence and side house need different cleanups.


Here is my render pass for this week. I have a lot of work to get done before I submit. Much of which include the shaders, clean plating, and shaders. Overall, progress is progress.
Render time hasn’t much of an issue as lower res - about 7-8 minutes per frame.
Class 17:
For this week, progress has been super slow with my attention focused on my Harbor Picture renders. Despite this, I did a little bit of work with my textures and lighting for my project. I didn’t get around to doing my clean up on my plate, but I was able to get a quick render of a few layers. I did a render of my Case Beauty, Interior Beauty, and an Alpha Pass. Here are the layers I have currently rendered.


I’m compositing using some breakdown techniques for some post-processing as well as converting alphas. Here is my node tree as it stands.
After all this for this week, here is a render test I have completed with all my layers composited. I plan on working more on the animation, I couldn’t get the pivot the guitar lid to look quite right when animating so I will look more into that!
Week 8:
Class 16:
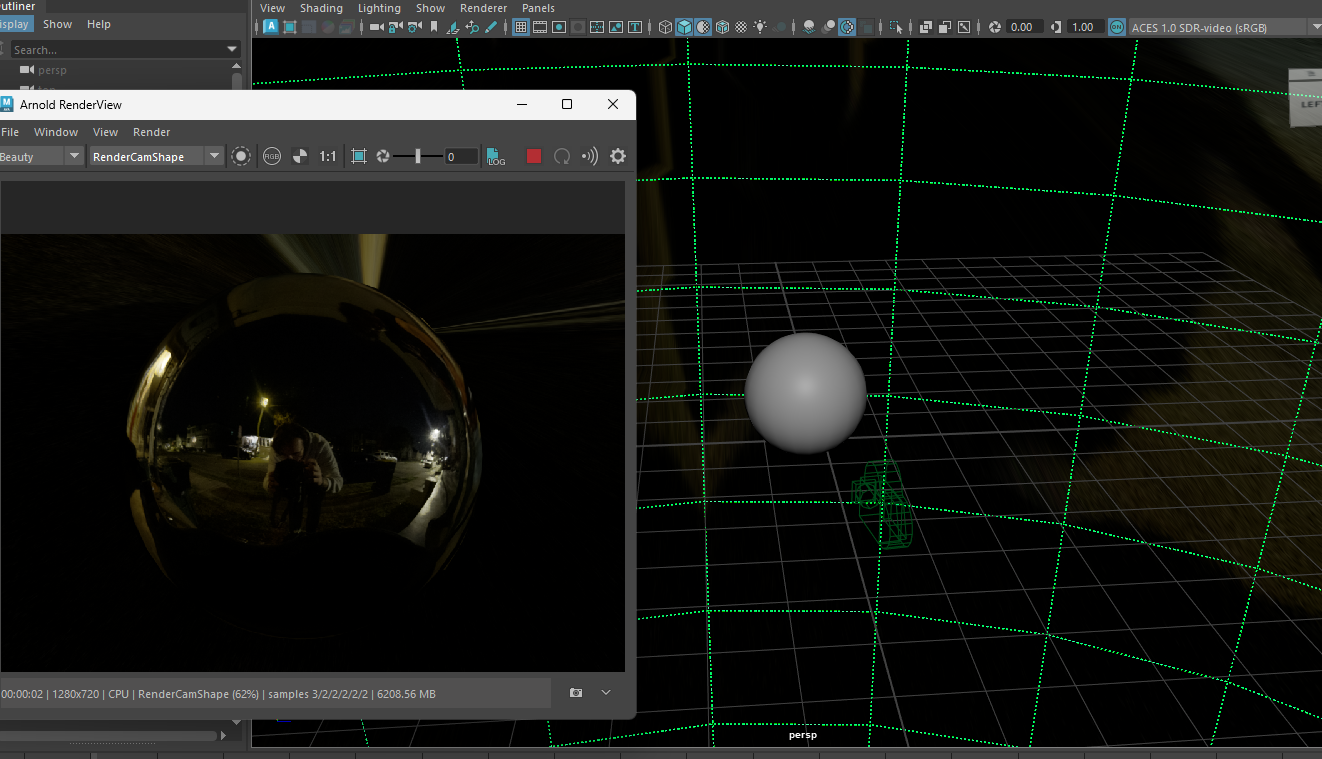
This project has been moving slower for me than previous ones, but progress is still being made. The first step this week was getting my HDRI ready to implement in my scene. I took bracketed exposures of the fancy kit chrome back with the interior of my case open. Here is a chromeball render with my HDR merged and set into Maya.

To help mimic the lighting, there are two key lights in my shot, a cool one coming from a lamp on screen right and a warmer one on screen left. I plan on using a spotlight to mimic these lights in my scene, intensity and color to be worked on. Using a model from Sketchfab, I was able to get the base shape for my guitar case, but using this and real measurements I was able to get my case very close. I am not exactly a modeler, but I am not worried about getting the details in the case there. Here is the scene set up with the lights.


I created a texture reference on my object using the projection of my clean plate on my object. I plan on turning this projection into UVs to make my future easier, but that will be a next step. Here is a slap comp of my current WIP Render. Lot’s of work to get done, but progress is progress.
Class 15:
This week, I was super pre-ocupied with a number of issues with another project. However, despite the time spent on that other class, as well as the career fair, I still had a little bit of time to shoot and begin the preliminary work of project 3. For my clean plate, I shot at night at around 1 am with only light from my neighbors house and a nearby lamp post for my lighting. I have never done a CG lighting/integration with a night scene so I wanted to give it a try. Here is my plate which I used a Cannon R5 camera and a 15-35mm zoom lens. As well as that is my chrome ball for the lighting information I will be using.
Initially, I wanted to use SynthEyes for my 3D track again and basically give myself more practice in the program. However, the tracking output I was getting from SythEyes was super shaky and not very well solved. I did a number of changes in my tracking, solving, and error correecting but I still couldn’t get a decent result. This was the best result I got after about 30 minutes of trying.
Since SynthEyes wasn’t working today, I decided to take my plate into NukeX and use the Classic 3D Tracker for my camera. This worked much better as I have more experience in Nuke’s tracking and was able to control the track slightly better. Here was the result from the Nuke camera as well as the Nuke script.
I then took this camera into Maya and set up my scene that I plan on using for this project. I am a big fan of Jazz music and Jazz bars, so I wanted to create a Jazz stage/scene/performance for my case’s interior. Here is a list of the assets that I plan on using - the guitar case isn’t my exact one, but it gets me close enough that I can manipulate how I need to.
All Models:
Piano - https://www.cgtrader.com/free-3d-models/furniture/other/grand-piano-deff8377-828c-436f-aae3-320456c631b3
Drums - https://www.cgtrader.com/free-3d-models/sports/music/drums-36b843eb-14e9-4739-8eaa-19301cdbeee1
Saxophone - https://sketchfab.com/3d-models/saxophone-alto-08448f4bfbca474b80ba35a571648a27
Trumpet - https://www.cgtrader.com/free-3d-models/sports/music/trumpet-3d-model-63737a6b-da4b-4120-a184-7cbe6ab91b90
Guitar Case - https://sketchfab.com/3d-models/guitar-and-case-fb279ea0831a4d1fa7adff24c231b478#download


For this weeks work, here is a combination of my track and asset collection in a playblast for my scene! This week will include manipulating some geometry to get the box in the right spot, cleaning up the track a little bit, and starting a few projections for my box.
Week 7:
Class 14:
Between last class and class 14, I had some time to think about the direction I want to take my project 3. I am getting a camera on Thursday so I can shoot my clean plates and HDR. I definitely am not wanting to use the plates I took before last class. For one, they are all still frames and for two, they are super boring and there isn’t really any story behind any of it. I want to use my guitar case and do something unexpected as the reveal when it opens up. I don’t think I want to just put a CG guitar in there as though it would look nice, it wouldn't exactly be fun. So I want to have my guitar in either of these locations. One is my front porch while the other is my drastically overgrown backyard. I also want to shoot at night as most of my stuff has been daytime lighting and comp and I want a new project/challenge. Here are those locations/filming angles. Note that these likely wont be the camera angle I will end up shooting from.


Instead of having a guitar be in my case, I want to do a little drum set slowly being raised out of the box. Kind of like a music box, where it spins and plays itself. I don’t think doing any animation with a character would be exactly fun, but doing some keyframes of stylized floating drumsticks playing a beat seems enjoyable. This is just a rough idea, but definitely the direction I want to take my project. Here is an asset I have found as well as some reference for stand I want my miniature drum set to sit on.
Drum Asset - https://www.cgtrader.com/free-3d-models/sports/music/drums-36b843eb-14e9-4739-8eaa-19301cdbeee1


Class 13:
The weekend between Class 12 and Class 13 was about doing the final touches and render of our Complex Shader and lighting Project. Not much changed for my project except for the some volume parameters, and caustic changes. One of the things Professor Gaynor mentioned was adding a slight bit of color to my caustic/shadow due to my object being both transmissive and translucent. Here is that new casutic/shadow for my object.
I also changed my geometry of my Ground Plane so that it expentds further and my shadow isn’t clipped. Overall I am very happy with my end to this project. I couldn’t focus on it much as my SANM-560 collab project has taken a bit of priority overall. Here is the final render for my project, as well as my Nuke script
For my submission, I also created this breakdown for every layer and the process I used. This project taught me a lot and I am happy with the outcome. With another week, I would want to address the lens flare as I couldn’t afford the time to look into it.
I also took some photosets for Project 3. Here is my current options I have, I might reshoot them with a better camera and setting, but these are the current one for a guitar case.


Than for good measure, I also took these of the fancy kit case.


Week 6:
Class 12:
In class 11 of this week, we did a lot of ground plane render layers. Mainly for setting a render pass for reflections on reflective surfaces, as well as caustic shadows. The reflective render pass we learned in class was similar to the way I did them before class 11. I changed a few parts of it including turning off the specular of the HDRI so I can get proper light passing through my glass bunny on the ground reflection. After this we worked on adding caustics for our glass render pass. We made this shader using transmission amount and transmission color. I used a ramp and the aiFacingRatio placement to create a fresnel “caustic." This is a way to fake caustics which works perfectly for our project. Using the same method, I created a shader for masking the caustic fresnel, using a colored ramp node and projecting it on the bunny color. Here is the shader setup for the masks as well as the render passes.


To comp these passes, I took the alpha of the shadow cast, shuffled out the red channel into the alpha, inverting based on the mask of the shadow cast. Merging the fresnel mask to add less variation in the shadow, before shuffling it into the alpha and copying the shadow cast alpha and color back into the final cast. Here is that node tree in Nuke for how I created the caustic shadow. My object is more translucent than transmissive, so I may knock back the caustic more than it is right now. Also, here are all the current render passes that I have used in my comp, all of them are part of a different render layer.


Still some small changes to make, but overall, it is getting there. Here is the current test render, extending the shadow is to come soon. Here is also some new reference photos I took from my rock being backlit.


Class 11:
This past week hasn’t been super productive as far as this project is concered. I have been swamped with running test renders for another class/project. Despite this, I have added one crucial thing to my current render pass which includes a subtel reflection on the ground. My bunny is sitting on Snow, which isn’t overly reflective, but a small amount of bounce color and reflection from my bunny to the ground is exactly what I think it was missing. For this, I rendered out 3 new layers. A ground reflection layer, which is virtually the ground plane with a super reflective shader on it. I took out both the HDR and Keylight so I didn’t have any weird reflections or highlights. Here is that render.
For my other renders, they were passes of the reflection alpha and a second AO of the bunny. For the reflection alpha, I rendered the bunny reflection with a red surface shader and took the red channel as my alpha in Nuke. I masked this with the second AO so that it have a nice subtle fall off that wouldn’t require any rotoscoping work. Here are those renders as well as the Nuke script for it.


I did some minor changes here and there with my shaders, but overall, much is the same. Here is the current render pass with slight noise and a few shadow frames missing.
Week 5:
Class 10:
After last class I was able to spend some more time really refining my render layers and added a few more to help with some issues I had in my comp. First, in class we went over building some fractures within our objects. Some rocks, including mine, have variation on the interior due to a number of reasons. So to build this in our render, I had a singular pane that I added a marble displacement too. I cranked the subdivision sup as well as the height so that it spread throughout the entire model of the bunny. Here is the 3D environment of the fracture, with the object setup, the render of the fracture, and the fracture on the glass.


After this, I noticed the bottom part of my bunny was super bright, likely due to it being on a super bright surface, this being the snow. So to combat the amount of light passing through the SSS and Transmission, I rendered out another pass of AO, being from the lens of the bunny. This is the render pass of the AO on the Bunny as well as the before and after of the comp.


Overall, there were subtle changes to the colors and values of my shaders, basic troubleshooting using my own rock as a reference. Here is the LayerMergeSheet that shows all my render layers and passe that I have comped
I also have layed out my nuke tree a little differently, the premise is still the same, just more organized and controllable. This shows the way I adjusted and merged the fractures as well as the AO on the bunny.


Overall, I have made some good progress, but there is still work to be done, until then, here is a raw render pass with some changes in my comp. There is some hitching due to a few missing frames.
Class 9:
During class 9, we spent a lot of time exploring subsurface scattering and how to use it efficiently for our projects. We dove into how light bounces within the objects, the controls within the Arnold shader as well as result, and how to best use it within Nuke. For this project, since we are doing transmissive/translucent rocks on our Stanford model, we need to know how to use both Transmission and SSS to “build” up our rock. We are doing this with render layers and doing separate passes of our renders. For my rock, it is more subsurface than transmissive, but still has some glass qualities to it. I plan on doing SSS, Glass, Specular, and Volume Beauty passes. For my shadow, I will only need a shadow matte and AO.
For my SSS shader, I built it matching the color of my physical rock I have, and viewing different lights behind it to see the translucency. The best option I used was using the sun and my phone flashlight, backlighting the rock, so I can see the transmission and SSS. Here is my SSS shader that I built as well as my pass render I did.


I then went and built my transmission and specular shaders which will go hand in hand in compositing. For my rock, it isn’t super high in how much light it catches, but it does have a lower roughness. I have a glass shader on one pass that includes that same color of my rock in the scatter color and added extra roughness. I decided against using depth since I will be using SSS and Volume later in my comp. Here is my glass shader I built as well as the specular and glass render passes.


For my comp, I knew I was going to need some way to control my transmission and translucency, so I also rendered a Fresnel layer which is a surface shader with a ramp of red, green, and blue into the surface color. I then replaced the placing node with a facing ration node to have it placed face toward wherever the camera is in space. Here is that shader set up as well as the render of it.


Then after all this I sent it to the render farm and took my layers into nuke. Here is a picture of the node tree I have set up and the final picture of the beauty corresponding with it. It includes a series merge pluses that do something similar to AOVs. For the Fresnel, I took an in and out merge of the red and green, with some grades, and sent into the transmission and translucency.
This was some of the work I have finished for this week. My next plan will include working the lighting and the shadow, getting that looking right and close to realism.
Week 4:
Class 8:
I have been at work on this project just a little bit since Monday, doing some basic scene prep before I can move on to lighting. The first thing I did, with some guidance from Professor Gaynor, was color correct my raw plate. We did this by adjusting the ranges in a color correct node in Nuke. Setting the shadows, midtones, and highlights to rgb. This helped me identify and adjust the ranges accordingly so that when I did the color correction, no spot was overpowering the others. I then adjusted each parameter accordingly and here were the results as well as parameter changes.


Next, I took my project to Maya and set up my render layers. I plan on doing 3-4, with beauty, shadow, AO, and likely fresnel. After I had my layers set up, I wanted to try and adjust my cast shadow to be similar to my real plate. I had taken a still image of my perspective cube, lined up my CG camera (a different one then my RenderCam), and began adjusting my keylight accordingly. Here was the setup for that process and the markings I made to get it as close I could. This was particularly challenging as the ground plane wasn’t a flat surface. I ended up taking a cylinder and stretching it based on the reference photo. It isn’t exact, and will likely be changed, but for a quick slap comp, it will work just fine!


I rendered a quick test with basic lighting and a simple transmission shader and saw how my lighting and camera track looked. In my render I had specular_direct/indirect AOVs as well as transmission_direct/indirect AOVs. I took my render into Nuke, only needing 3 different elements for right now. For one I did a CG breakdown of my beauty shot, using the AOVs I just listed, for another, a shadow mask and color correction based on my clean plate, and finally an AO masked in the shadow. These were quick and dirty so any changes to the grading and color correction can be done on a future date. Here are those node trees for the current WIP.


Combining all that together I have a simple render pass of my bunny in my scene. Here is that test render as well as a breakdown of most of what I have just explained.
Class 7:
Getting some more work done this past week has been a real struggle with the snow storm making getting to and from Montgomery Hall to get work done very difficult. But over the weekend I took my plate that I filmed last week into Boris FX’s SynthEyes program. I wanted to try 3D tracking in a program beside Nuke to expand my skill set beyond NukeX. Here was my original plate that I took into SynthEyes.
I imported my clean plate into SynthEyes, set up my tracking amount and specific camera data and started the track. I solved the track by cleaning it up based on the calculated data and refining it. I then unconstrained the points. So that the data won't be affected or controlled by new camera data. I then added a placeholder cube into the 3D scene to test the track and get it to the point I like. I rotated the ground plane to be level with my plane in which my Stanford model will be on. Here is the video of that track from SynthEyes.
I took this tracking data and exported it as an FBX so I get the location and size data in which I can then import it into Maya. All that needed to be redone was some sizing and placement. Here is a playblast of the current camera in the Maya viewport with my Stanford model.
I also got to work merging my HDRI for my Clean Plate which was taken day of shooting, here is that HDR image that I plan on using for my comp. (Compressed to a JPG)
This was a short bit of work I was able to get done, but I am excited for where this project is headed
Week 3:
Class 6:
In class 5, we had our final critique before our final submission. The changes I was suggested included minor color correction, slight change in the AO, and a small increase in the Keylight Diffuse amount. Then it was a matter of rendering out the rest of my frames. This was particularly difficult as Montgomery Hall, where I get most of my work done at SCAD, was closed for a few days due to the winter storm we are having. This made rendering quite a challenge as my at home computer can’t exactly run Maya, much less render anything. Since my maya project didn’t need any changing, and I already had it uploaded to the farm, I could utilize the Render Farm in my render process. I ran into issues with missing frames, and errors in my scene files, but ultimately, I got the job done. Downloading the render .exrs on my home computer took quite a minute, as there were about 450 frames per 5 render layers.
Here was the final Node Tree of my project file, including the beauty CG breakdown, shadow and AO adjustments.

I rendered this project out as a tiff sequence so that I could take it into Premiere Pro and import it. This is the final render.
I had a lot of fun doing this project, as live action lighting and composting is definitely something that I really enjoy. I learned a lot about AOVs as well as lighting for real life environments. I hope all my other projects go just as well, and I have just as much fun. Here is the project breakdown for this whole project.
Class 5:
Though we are still in production for project 1, I wanted to capture some preliminary plates for project 2, which will include complex shaders using transmission/refractions. Here is the first shoot I did, one clean-plate has movement, which the other is a simple still frame with a cube.


Here is the HDR I took as well as the Grey Sphere references.


After last class on Thursday, there was still work to be done regarding my project. The first thing I did was redoing my simulation of the tennis balls to make the shot more interesting and for them to fall all the way down the stairs. It was done the exact same way of using RBDs on my tennis balls and using the stairs as a static object. Here was that node setup.
However, I went on to troubleshoot some issues with lighting and whatnot, I wanted to test casting the shadow front he railing near my scene. Initially, I was going to model the railing and cast the shadow in that way, but Professor Gaynor taught us a way that I wanted to try first. The process for doing this required taking the initial shot and rotoing/luma keying the bright parts of my image and the darker ones. Where the light is and where the shadow is. The issue I am seeing with this part is the lack of control of the fading on the mask. I also found out pretty quickly after doing a test render that it wasn't possible with this method as my shot is on stairs and not a flat surface. So casting this “fake” shadow on my object from the view of the light would require much more work on parts of the stairs that aren’t in view from the RenderCam. Here are the images from that test, but I quickly pivoted away from it. One is the view from the RenderCam, and the other is from view of the KeylightCam.


I decided my next action would be to recreate the stairs based on the size of my reference. Since this image is taken right outside where I work at Montgomery Hall, I went to take reference of the stair railing that was casting the shadow. It took some maneuvering around with the geometry, but I got the cast shadow to line up close to the reference image. Here is the geo I made using simple geometry in a separate render layer.
This geo made changing the shadow radius and cast direction easier to control as they were set values and not an image. From this I rendered a black/red image of the alpha from the cast. This is the result of the cast show on the tennis balls, it isn’t perfect, but it gets the job done!
Before I rendered this pass for the shadows I created 4 new AOVs that would help me control the shadow casting on my object. For my beauty layer of my render, I created AOVs of the sun and sky direct diffusion, and the sun and sky direct specular. This allowed me to shuffle them out in the beauty CG breakdown and control the grade for each of them. I attached the cast shadow pass render into the sun diffuse direct pass and the sky diffuse direct pass and cranked down the gain to make my cast shadow. Here is the node tree of how I did this in Nuke.
Next thing I wanted to tackle was adding ambient occlusion onto my tennis balls. I did this by adding a simple ai_AO shader to the ground plane and rendering it as a black and red image. I then rendered this sequence out in its own render layer. I then took this render, shuffled the red channel into the alpha of the sequence, then using the alpha of the shadow pass, I can isolate it to be in the shadow on my object. This is the render of the red pass as well as the shadow alpha.
This is the comparison of adding my ambient occlusion versus prior to having it. Here is also the node tree of how I made the AO Alpha in Nuke.
Combining all this together here is about 250 frames of the current render. There is some skipping as time was affecting my ability to render frames that errored out, but that is to be tackled soon.
Week 2:
Class 4 - After the critique in Monday’s class, I revisited my render layers and found that my HDR was in my Shadow layer, which was messing with the alpha of my shadow matte that was composed in Nuke. I still wanted a slight bit of the HDR to effect my shadow, but it was on intensity of 1, which was too overpowering, I put it on 0.1 to have minimal effect on the render. This is the second test comp with my Grey Ball, with slightly changed keylighting, and HDR shifting. I feel the shadow is well comped and seems close to the reference in size.
Below on the left is the current test Comp with a Grey Ball, and the right is original Live Action Reference.


After I got my lighting moving along, I wanted to find my model for which I will complete my simulation through light. I landed on this model from SketchFab by Arman Abgaryan.
Model Link - (https://sketchfab.com/3d-models/tennis-ball-8f1cbc19dc414ad89097eabe063ada88).
I took this model, as well as the textures into Maya, testing the lighting and fixing the textures where needed.
I then extended the staircase downward in accordance with the relative size to the reference. I will soon measure the real life size of the staircase so I can get a more accurate result. But After creating the staircase, I took my created assets and imported them into Houdini as an FBX.
From the geometry I was able to run a quick RBD simulation of the Tennis Balls on the staircase, using a collision point of 0 on a concave surface so I can get a more accurate result. I also added a slight wind force so that the Tennis Balls move forward at a realistic rate down the staircase and don't just stay stationary. Here is the layout in the houdini viewport as well as the node tree.


I then exported this simulation as an alembic file which could then be rendered using the textures from SketchFab and the lighting system I had set up. I did run into a few issues with rendering, tiling the projection onto the ground plane messed with my lighting and required some playing around, but it ended up looking good.
An issue I ran into with the render was losing the Alpha for the staircase in my Beauty Scene. To combat this I created another render layer and did a white surface shader on the balls and a black one on the stair case which could then let me shuffle the color into the alpha in Nuke. Giving me a new alpha to use for my render.
My next steps will include finalizing the overall lighting and bounce color, re texturing the color/shader for the Tennis Balls, rendering the Occlusion Layer, and adding the second shadow.
Class 3 - After Class 2, from Week 1, we were tasked to finalize our camera and start matching the lighting/HDR from our reference. To start with this, I took the shadow distance from the Cube/Ball, marking distant with the Maya pen. I am using a spotlight as my Keylight since I am most comfortable with it.


After this I matched the Chromeball to the reference provided. I didn’t have a clear angle, nor the right reference of where the HDR was shot from. But for my best guess, I have it in the right position.
After that, I set up my render layers. I’m creating 3 layers for this project including Beauty (Just the object), Shadow (Isolated shadow), and Occlusion (Darkest part of shadow). For each of these layers, I can add AOVs (Arbitrary Output Variables) to the .exr renders so that in Nuke I can do a CG breakdown and control each part of the shuffle. For AOVs, I will likely keep them as follows: diffuse (direct/indirect), specularity (direct/indirect), Z, N, and P


I did a test render so that I can do a test comp with just a plain grey ball. This is the Node setup for not only the CG Breakdown but also how I copies the alpha from the shadow render to the full shadow reference.
Layer Contact Sheet for beauty render (Showing all AOVs present):
This is the current still test comp as well as one with some motion.
Week 1:
To kick off the first week of Technical Compositing, we are tasked with creating a CG Integrated Model into a plate that has complex light and shadow. We had the option of choosing from a photoset or taking our own stills. Since I do not own a high quality camera I decided on these photo stills to use for my project.
Here is also the data for the Photograph taken which we then use to create our CG Camera
The Canon EOS 5D Mark III has a crop factor of 1, so the focal length should be the same as is it in the data, being 108mm
I took this camera data and photo into fSpy which then enabled me to get a camera into Blender, using an add-on extension. I then exported an FBX and was able to transfer the camera and position into Maya. This was the fSpy set up as well as the match made in Maya for the camera position.